Integrating Google Forms into Sheets would be a killer option allowing users to automate their workflow in a flash! Making this your power to collect and manage data helps reduce the risk of errors, saves your valuable time, and analyses submitted information for better day-to-day business processes. Let’s scroll down and browse through 2 recommended tips for hassle-free data transformation!
1. How to autofill your data from Google Forms to Sheets
Google facilitates the efficient workflow by letting users integrate one Google tool with another. You can now connect your Google Forms to Sheets and make the most of this integration to manage data into a very digestible format when any form response is submitted.
Here is a detailed guide you may need:
Step 1: In your selected form, click on the “Responses” tab.
Step 2: Click on the three dots button (⋮) located in the top right corner and choose “Select responses destination” from the drop.
Step 3: When selecting where your responses will be, you can either choose to “Create a new spreadsheet” (If you haven’t had a spreadsheet yet) or “Select an existing spreadsheet”.
Step 4: Name your Sheets to be more descriptive.
Step 5: Customise the settings for the form in the drop. You can choose to include the form responses in summary, receive email notifications, or set up response validation rules.
Step 6: Click “Save” when you’ve finished customising the settings and do a test.
Responses will now be transferred directly to your Google Sheets and respectively store your data whenever someone submits the form!
2. Level up your automatic conversion with PerformFlow
With digging more into your insights, PerformFlow was developed to meet all your needs by allowing you to effortlessly transfer data before your next!
Outperforming the Google default feature, PerformFlow lets users fully customise their workflows to suit their specific needs and deal with large amounts of data. Each column in the spreadsheet corresponds to a question on your form with all responses recorded, including essential information such as submission time, recipients, respondents, and the corresponding request numbers.
- Step 1: Install the PerformFlow Add-on for Google Forms by clicking the button below
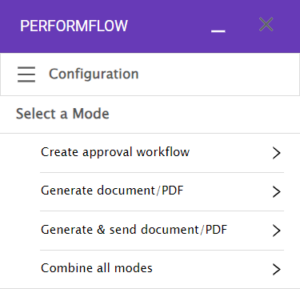
- Step 2: Select “PerformFlow” from the “Add-ons” menu in the toolbar on your form

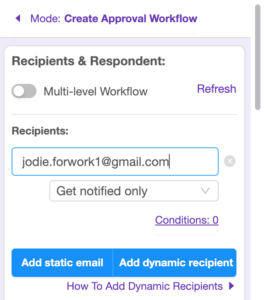
- Step 3: Start Configuration and Select “Create Approval WorkFlow”

- Step 4: Fill the email address of recipient

- Step 5: Save and test, if someone submits the form, it will appear in the corresponding spreadsheet.
With a user-friendly interface and aforementioned outstanding strengths, PerformFlow is an innovative tool for users of all levels and businesses of all sizes. Sign up for PerformFlow today and make the most of it to start streamlining your data entry process!