
Setting up Google Forms is a straightforward process that anyone with a Google account can do. Whether you’re looking to create a simple survey or collect detailed responses, Google Forms offers an intuitive platform to get started without any coding skills. While there are some limitations to more complex forms, it remains the perfect tool for beginners who want a quick and easy solution. In this guide, we’ll show you how to set up Google Forms step by step, ensuring it’s simple for anyone to collect the information they need.
Table of Contents
What is Google Forms?
Google Forms is a free, web-based tool that enables users to create surveys, quizzes, and various types of forms. As part of Google Workspace, it seamlessly integrates with other popular tools like Google Docs, Google Sheets, and Google Slides.
To learn how to set up Google Forms, visit: https://www.google.com/forms/about/. You’ll be able to choose from a range of pre-made templates or opt for a blank form if you prefer to build one from scratch. Setting up a Google Form is simple and doesn’t require any coding skills or design experience—follow the easy steps in this guide, and you’ll be on your way to collecting responses in no time.
Top Use Cases for Google Forms
Google Forms is a flexible tool that fits various tasks and industries. Here are some of the most common ways it’s used:
- Education: Quizzes, student feedback, or attendance tracking.
- Human Resources: Employee surveys, leave applications or recruitment forms.
- Event Management: Registrations, attendee feedback, or post-event surveys.
- Customer Service: Collect customer feedback, product reviews, or support tickets.
- Marketing: Gather insights on campaigns, track leads, or conduct market research.
How to Set Up Google Forms: Step-by-Step Guide
Learning how to set up Google Forms is simple and versatile, allowing you to customize it for your unique needs with just a few clicks. Below are the key tasks involved in setting up and optimizing a Google Form:
- How to Create a New Google Form
- How to Add Questions to Google Forms
- How to Add Sections and Logic in Google Forms
- How to Customize the Appearance of Google Forms
- How to Analyze Google Forms Submission Data
- How to Configure Additional Settings in Google Forms
- How to Share a Google Form
- How to Share a Pre-Filled Google Form
- How to Use Google Forms Add-Ons
How to Create a New Google Form
Step 1: Go to Google Forms and log in with your Google account if required.

Step 2: On the Google Forms homepage, click the + Blank form option to start with a blank form.

You can select a pre-designed template from the template gallery for specific use cases, such as event registrations or quizzes.
Step 3: Add a Title and Description
- Click on the Untitled form field at the top to enter a title that reflects the intent of your form (e.g., “Event Registration Form” or “Customer Satisfaction Survey”).
- Below the title, add a description to explain the clarify the form’s objective or provide instructions (e.g., “Please fill out this form to register for our event. All fields marked with an asterisk are required.”).

How to Add Questions to Google Forms
If you’re using a template, you can skip to updating and arranging questions in Step 3. To add questions to your form, follow these steps:
Step 1: Click the Add question button (the plus icon) on the right side of the form.

Step 2: Choose Question Type:
To the right of the question title, select the question type you want to use.
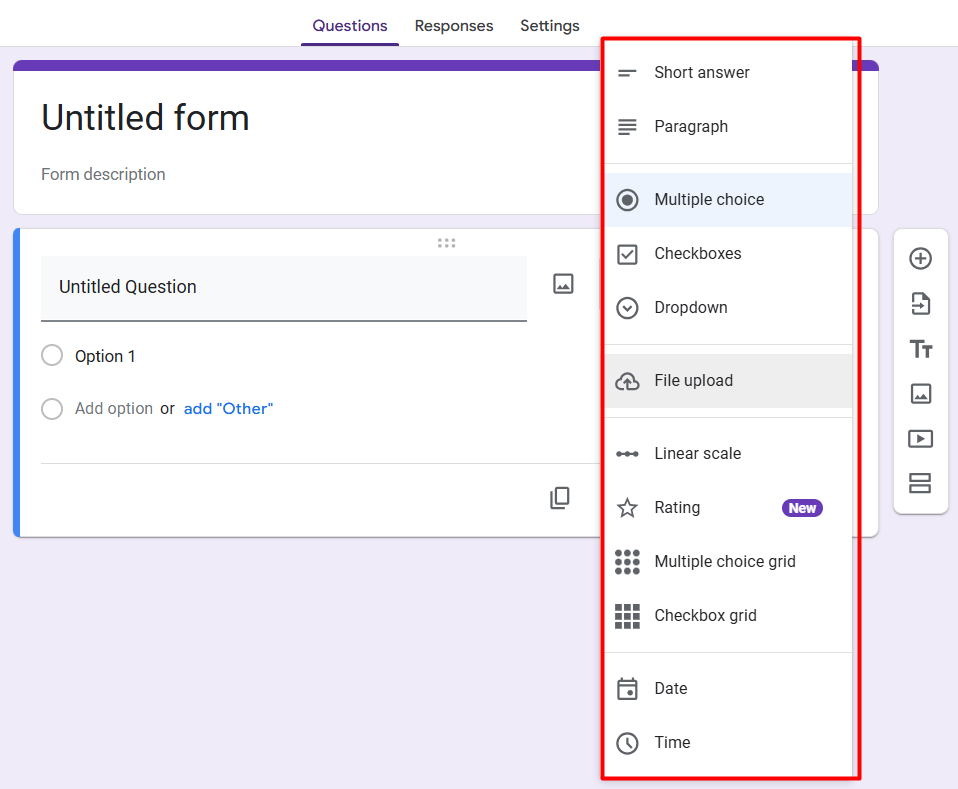
Google Forms offers a variety of question types to suit different purposes, including:
- Short Answer: Use this to collect brief responses, such as names, email addresses, or small amounts of text. Respondents are provided with a single-line text box but can enter as much text as necessary.
- Paragraph: Best for gathering detailed or long-form responses, such as open-ended feedback or explanations.
- Multiple Choice: Allows respondents to select only one option from a list. This type also supports advanced features like section jumps based on answers and shuffling options to reduce bias.
- Checkboxes: Ideal for questions where multiple answers are allowed. Respondents can choose as many options as they want. This type also offers data validation to limit the number of selections but doesn’t support section jumps.
- Dropdown: Similar to multiple choice, but responses are displayed in a dropdown menu, saving space on the form when many options are available.
- File Upload: Lets respondents upload files, such as images, documents, or videos, which are saved directly to your Google Drive. Use this option only with trusted users.
- Linear Scale: Perfect for rating questions, this type allows respondents to select a value on a numeric scale, such as 1 to 5 or 1 to 10. You can also label the lowest and highest values for clarity.
- Rating: Enables respondents to rate an item using stars. It is ideal for collecting feedback on satisfaction, quality, or overall experience. The number of stars can be customized, typically up to five.
- Multiple Choice Grid: Displays questions as rows and answer options as columns. Respondents can select only one answer per column, making this type useful for structured data collection.
- Checkbox Grid: Similar to the multiple choice grid, respondents can select multiple answers per row. This format is often used for comparisons or satisfaction ratings.
- Date: Collects specific dates for scheduling or logging events. The format automatically adjusts based on the user’s regional settings (e.g., MM/DD/YYYY or DD/MM/YYYY).
- Time: Captures time in hours and minutes, which is helpful for scheduling or measuring durations.
Step 3: Type Your Question
After selecting the question type, you type your question text in the field provided. Besides, you can add possible answer choices (if applicable).

To ensure people answer the question, turn on the Required option.

In the process, you can update and arrange questions as follows:
- To move a question, click Drag at the top of the question and rearrange.

- To add a description to a question, click More and then Description.

- To add an image or video to a question, click Add image or Add video.

- To delete a question, click the trash can icon labeled Delete question.

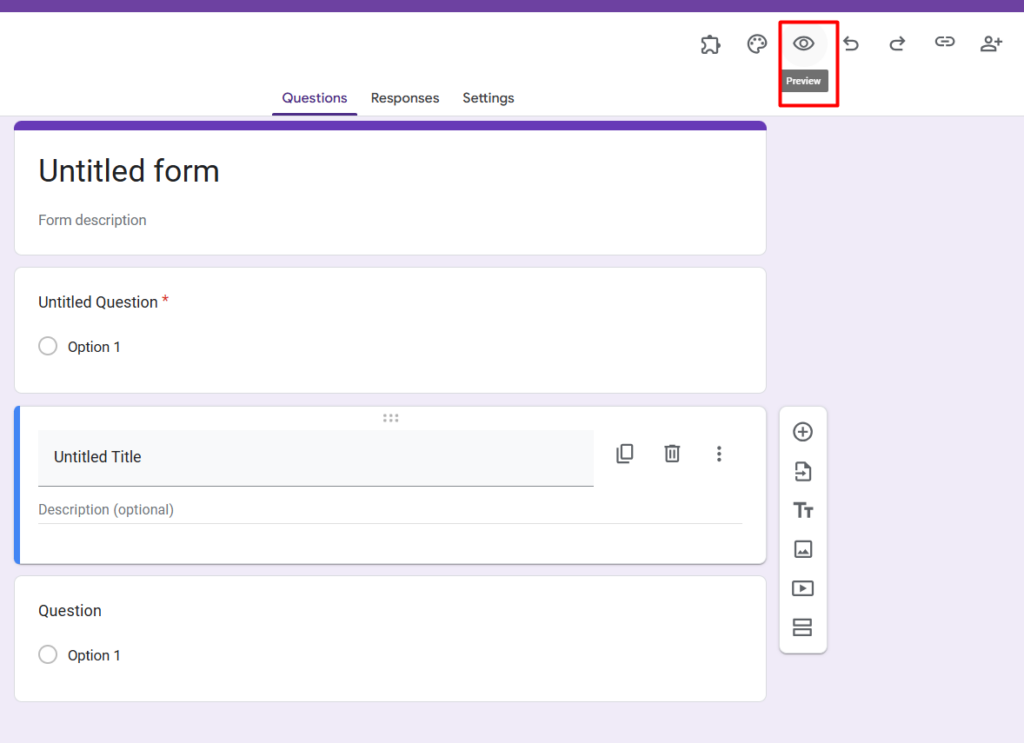
- To preview your changes at any time, click the Preview button at the top right.
How to Add Sections and Logic in Google Forms
- Sections in Google Forms
- Sections help break your form into manageable chunks, allowing respondents to focus on one set of questions at a time.
- To add a section, click the Add section icon (an equal sign “=“) from the floating toolbar. A new section will appear below the current question, where you can add a title and description.

- Note: To reorder sections, at the top of a section, click More and then Move section.

- Logic in Google Form
- To ask follow-up questions based on a respondent’s answer, here’s how to use form logic:
Step 1: Create a multiple-choice or dropdown question (note that form logic only works with these question types).

Step 2: Click the More options icon (ellipsis ⁝) in the question box, and select Go to section based on answer.

Step 3: Adjust the next-step options beside each answer. In the example below, if a respondent selects “Yes”, they can be directed to Section 2 (Like). If they select “‘No”, they can be sent to Section 3 (Hate).

Note: Avoid selecting the current section’s name as the next step, as this can create a loop that prevents respondents from completing the form.
How to Customize the Appearance of Google Forms
Click the Customize Theme icon, which looks like a paint palette.

In the Theme panel, you can adjust various elements of your form’s design:
- Theme: available if your administrator has made them accessible.
- Color: choose a theme color and background color for your form. To add a custom color, click Add custom color.
- Header: click Choose image to upload your own photo as the header.
Font: Under the Text section, you can change the font style for headers, questions, and text. Select the text type you wish to edit and then adjust the font style and size accordingly.
How to Analyze Google Forms Submission Data
After you learn how to set up Google Forms, analyzing the submission data is the next step to extract valuable insights. Google Forms allows you to view and analyze the data through Google Sheets or other integrated tools.
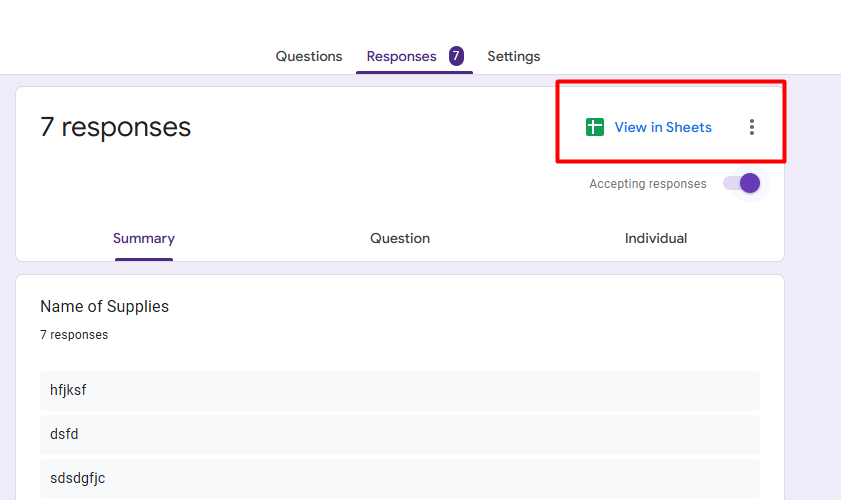
To access form submission data, go to the Responses tab within your Google Form.

You can choose to view responses directly in Google Forms or link the form to a Google Sheet by clicking the Link to Sheets button.
How to Configure Additional Settings in Google Forms
To configure your Google Form, go to the Settings tab:

1. Share as a Quiz: Enable the Make this a quiz toggle to turn your form into a quiz.

- In Release Grades, you can choose to release scores immediately or later after a manual review.
- In Respondent Settings, you can allow respondents to see correct and incorrect answers, as well as the points they earned for each question.
- In Global Quiz Defaults, you can assign a default point value for new questions.
2. Control Access: Manage how responses are collected and protected.

- Under Collect email addresses, you can either automatically collect emails verified by respondents or collect them manually.
- You can enable response editing after submission and choose to send a copy of the response upon request.
- To restrict access to users within your organization, turn on the Restrict toggle.
3. Presentation: Customize how the form and responses are presented.

- You can choose to show a progress bar, shuffle questions, or disable the autosave of responses.
- You can edit the survey submission message or show a link to submit another response.
How to Share a Google Forms
Once it’s done, click Send at the top of the form to access sharing options.

You can share your form in three ways, depending on your needs:
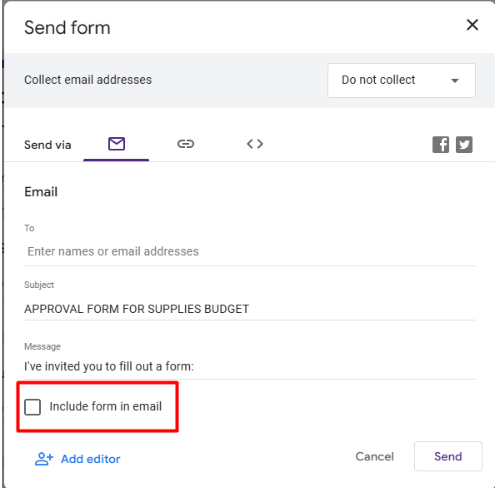
- Email:
Send an email invitation to recipients inside or outside your organization. You can click Include form in email to allow recipients to fill out the form directly in their inbox.
- Link:
Share the form via a full-length or shortened link, which you can easily distribute through email, chat, or other platforms.

- Embed to Your Site:
Embed the form directly on your website using a customizable embed code, where you can adjust the width and height to fit your site’s design seamlessly.

How to Share a Pre-Filled Google Form
To invite collaborators to review and edit your form, follow these steps:
Step 1: To begin, click the Share icon (a person with a plus sign) in the top-right corner of the form.

Step 2: In the Add people, groups, and calendar events window, enter the email addresses of the people you want to share the form with, or send it manually by selecting Copy response link and sharing it.

Step 3: Click Done to share access.
Note: You can transfer ownership of the form to someone else to set up the form. Learn how to do this.
How to Use Google Forms Add-Ons
Google Forms offers a wide variety of add-ons to expand its capabilities, allowing you to customize form notifications, collect signatures, manage approval workflows, and more. To get started:
Step 1: Click the More icon (⋮) in the top-right corner of your form and select Get add-ons to open the Google Forms add-on library.

Step 2: Find and install the add-on that fits your needs. Then, click the Add-ons icon (puzzle piece) above your form and select the add-on you want to use.
To manage or remove add-ons, visit the Google Workspace Marketplace to uninstall apps you no longer require.
FAQs About Google Forms
Q1: Can I collect responses anonymously?
Yes, Google Forms collects responses anonymously unless you enable email collection, which links responses to email addresses.
Q2: Can I edit a Google Form after sharing it?
Yes, you can edit the form anytime, and the changes will be reflected automatically for anyone filling out the form.
Q3: Is there a limit on the number of responses?
No, there is no limit on the number of responses. Google Forms can handle unlimited submissions.
Q4: Can I use Google Forms offline?
No, Google Forms cannot be used offline. However, you can fill out forms offline using the Google Forms or Sheets app, and data will sync once you’re online.
Q5: Does Google Forms support approval workflows or multi-step processes?
No, Google Forms does not have built-in approval workflows or multi-step processes. You would need external tools or add-ons to manage approval tracking and notifications.
Google Forms Automation: Streamline Your Workflows for Maximum Efficiency
Mastering how to set up Google Forms is just the beginning. To truly unlock its full potential, you can integrate workflow automation for tasks like approvals and requests. PerformFlow enhances Google Forms by turning it into an efficient approval system, automating leave requests, expense approvals, and more. With features like real-time notifications and multi-step approvals, PerformFlow helps you prioritize important tasks, reducing manual processes.
The setup is quick and easy—simply use Google Forms and automatic approval emails, with no coding required. Tracking requests becomes effortless as all submissions are organized in a single spreadsheet, eliminating the need to search through emails or documents.