- User Guide
Tips to Set Up Your First Workflow
Mode 1: Create Approval Workflow Only
1.1. Add Static & Dynamic Recipients
1.3. Set Conditions for the Recipient
1.7. Add & Use Recipient Group
Mode 2 & 3: Generate & Send PDF/document only
2.1. How to generate a PDF/document
2.2. Common file template errors
2.3. Send PDF/documents to recipients
2.4. Send PDF/documents to respondents
3.1. Combine Modes – Setup File Template
3.2. Combine Modes – Add recipients
Email Settings & Features:
4.1. Change Final Email Settings to Save Quota
4.3. Show or Hide the Sheets Report in the Final Email
4.4. Show File Attachment With Recipients
4.6. Customize Email Templates
4.8. Set Conditions for Custom Email Template
4.9. Add CC and BCC Email Addresses
Team Plan:
5.2. Share Edit Permission With Team Member
Additional Features:
6.1. Set Reminders for Approval Emails
6.2. Resend All Pending Requests
6.3. Dashboard or Form Management Page
6.5. Approval Link Authentication
6.6. Transfer All Forms to Another User
6.7. Transfer Paid Plan to Another User
6.8. Avoid Automatic Approval/Rejection
6.9. Signature on Generated PDF/Google Docs in Combined Mode
6.10. Approval Status Tracking Link for Respondent
6.11. Cancel a Request via Email
6.13. Change Approval Decision for Recipients
6.15. Approve via Dashboard for Recipients
6.16. Form Owner Approves on Behalf of Recipients
6.17. Bulk Actions: Approve, Reject, and Cancel
6.18. Set Conditions for Destination Folders
The Manage Forms page lets you view, search, organize, and manage all forms in your workspace.
Accessing Manage Forms
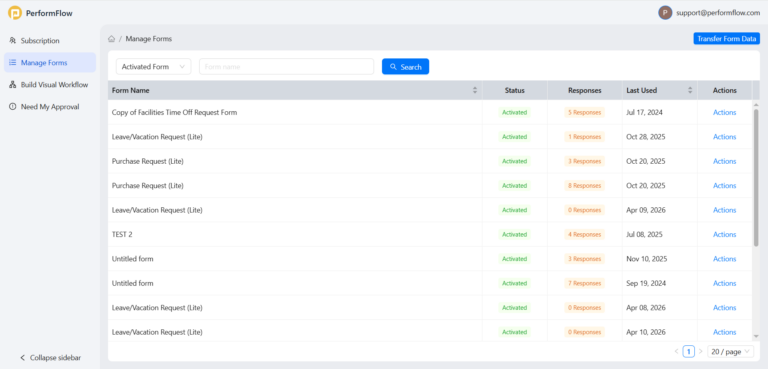
From the left sidebar, click Manage Forms.
On this page, you can:
- View all created forms
- Check form status and activity
- Review response counts
- Open form actions
- Transfer form ownership or data
Page Overview
The page includes the following sections:
Form Filter
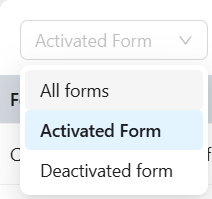
Use the dropdown at the top left to filter forms by status.
Example:
- Activated Form — shows only active forms
Search Bar
Use the search field to quickly find a form by name.
- Enter the form name
- Click Search
Transfer Form Data
Click Transfer Form Data in the top-right corner to transfer form-related data between users or accounts.
Forms Table
The forms table displays all available forms and their details.

Form Name
Shows the name of each form.
Examples:
- Leave/Vacation Request (Lite)
- Purchase Request (Lite)
Status
Displays the current form status.
Common statuses include:
- Activated — the form is active and available for use
Responses
Shows the total number of submitted responses for the form.
Click the response count to review submitted entries if available.
Last Used
Displays the most recent date the form was accessed or submitted.
Actions
Click Actions to manage a form.
Available actions may include:
- Track Request
- Open Form
- Open Spreadsheet
- Edit in Build Visual Workflow
- Deactivate Form
Pagination
Use the pagination controls at the bottom-right corner to navigate through multiple pages of forms.
You can:
- Move between pages
- Change the number of forms displayed per page
Sidebar Navigation
Use the left sidebar to move between sections:
- Manage Forms — view and manage existing forms
- Build Visual Workflow — create and edit workflows
- Need My Approval — review approval requests
- Subscription — manage account subscription settings
You can also click Collapse sidebar to minimize the navigation panel.